Starting in vitro fertilization (IVF) often means walking into the unknown you know there will be injections, scans, and a wait, but no one tells you exactly what happens on which day. This guide breaks the entire cycle down week by week, using real clinical timelines, so you know what to expect at every stage. Whether you’re preparing for a fresh transfer or a frozen one, the roadmap below removes the guesswork
Before Week 1: Pre-Cycle Testing and Preparation
About a month before injections begin, your fertility team builds your personal treatment plan. This includes an AMH blood test and an antral follicle count scan to estimate how your ovaries are likely to respond. Thyroid and prolactin levels are also checked, since imbalances here can affect implantation.
Semen analysis looks at volume, concentration, motility, and morphology, and helps decide whether conventional insemination or ICSI will be used later. A uterine scan or hysteroscopy also checks for polyps, adhesions, or fibroids that could get in the way of implantation. If anything abnormal shows up, it’s usually corrected before stimulation begins.
If everything looks clear, most patients start birth control pills or estrogen tablets in the cycle before stimulation. This “priming” step suppresses your natural hormone signals so that one follicle doesn’t grow ahead of the rest. The goal is simple: get your whole follicle group growing on the same schedule once injections start.
Some patients particularly those on a long agonist protocol begin a GnRH agonist injection around Day 21 of the prior cycle. This down-regulates the pituitary gland early, giving your doctor tighter control over the stimulation phase that follows.
Week 1: Starting Your Injections
Cycle Day 1 is the first day of full, bright-red bleeding this is when your IVF clock officially starts. Around Day 2 or 3, a baseline scan and blood test confirm your ovaries are quiet and ready for stimulation. Once cleared, you begin daily hormone injections.
These injections contain gonadotropins lab-made versions of the hormones your body already makes, just at a higher dose. Normally, only one follicle matures each month while the rest are lost. IVF medication is designed to rescue that entire group so multiple eggs can mature at once.
Injections are usually given at the same time each evening to keep hormone levels steady day to day. The starting dose depends on your age, BMI, AMH level, and how your ovaries responded in any previous cycles, with most protocols aiming for 8 to 15 healthy follicles by the end of stimulation.
It’s normal to feel some bloating, mild pelvic heaviness, or mood changes during this week these are expected side effects of the hormone rise, not a sign that anything is wrong.
Week 2: Monitoring and the Trigger Shot

This week involves frequent visits scans and blood tests every one to two days to track follicle growth and adjust your medication dose in real time. Your doctor is watching both the number of follicles and how evenly they’re growing.
Around Day 5 or 6 of stimulation, once follicles reach about 12 to 14mm, a second medication (an antagonist) is added. Its only job is to stop your body from releasing the eggs too early, before they can be surgically retrieved.
Once at least three follicles reach 18 to 20mm, and estradiol levels rise accordingly, your doctor schedules the trigger shot. There are three common types: an hCG trigger, a GnRH agonist trigger, or a dual trigger combining both the choice depends mainly on your risk of ovarian hyperstimulation syndrome (OHSS).
Timing of the trigger is exact and non-negotiable: it’s given 34 to 36 hours before egg retrieval. This mimics your body’s natural hormone surge, prompting the eggs to complete their final stage of maturity just in time for collection. Once the trigger is given, all other injections stop.
Week 3: Egg Retrieval and Fertilization
Egg retrieval is a short procedure done under sedation, guided by ultrasound. A fine needle collects the fluid from each follicle, and the eggs are handed straight to the embryology lab. Your partner provides a sperm sample the same morning, or a frozen sample is thawed, and it’s washed and prepared within one to two hours to isolate the healthiest, most motile sperm.
Eggs and sperm are combined within four to six hours of retrieval, either through conventional insemination where sperm are placed in a dish with the egg or ICSI, where a single sperm is injected directly into the egg. ICSI is typically used for male-factor infertility or when genetic testing is planned.
By the next morning, roughly 16 to 18 hours after insemination, embryologists check for fertilization confirmed by the presence of exactly two pronuclei, one from each parent. Eggs that fertilize abnormally are set aside, and the remaining embryos are moved into incubators that closely mimic the environment of the fallopian tube and uterus.
Many labs now also use AI-based grading tools alongside traditional visual grading. These systems analyze time-lapse images of each embryo’s cell division to help rank which ones are most likely to implant successfully an extra layer of objectivity on top of the embryologist’s own assessment.
Week 4: Fresh Transfer or Freeze-All
At this stage, your path splits. In a fresh cycle, the embryo transfer happens on Day 3 or Day 5 after retrieval, with progesterone support starting two days after retrieval to prepare the uterine lining. The transfer itself is a quick, catheter-guided procedure done without sedation — the embryologist loads the embryo into a thin catheter, and your doctor places it gently into the uterus under ultrasound guidance.
If you’re doing genetic testing (PGT-A) or your doctor recommends a freeze-all approach often due to high progesterone levels or OHSS risk blastocysts are biopsied on Day 5, 6, or occasionally Day 7. A precision laser removes a handful of cells from the outer layer only, leaving the inner cell mass, which becomes the baby, completely untouched.
The biopsied blastocysts are then vitrified an ultra-rapid freezing method that avoids ice crystal damage and stored in liquid nitrogen while the biopsy sample is sent for genetic analysis. In this case, your transfer happens in a later, separate cycle, which is one reason frozen-transfer timelines run longer than fresh ones. This is worth discussing with your doctor if age is a factor in your success chances.
Week 5: The Two-Week Wait (Fresh Transfer)
If you had a fresh transfer, this is the waiting period everyone talks about. Day 1-2 after transfer, the embryo hatches from its outer shell. By Day 2-3, it aligns and attaches loosely to the uterine lining a stage called apposition and adhesion.
By Day 4-5, the embryo begins invading deeper into the uterine lining, and by Day 6-9, implantation is essentially complete. At this point, specialized cells begin producing hCG, the hormone a pregnancy test actually detects.
Mild cramping, breast tenderness, fatigue, and light spotting are common during this window, but they can also just be side effects of the daily progesterone support you’re on. This is exactly why a blood test not symptoms is what actually confirms pregnancy, not how you feel day to day.
Weeks 5 to 8: If You’re Having a Frozen Embryo Transfer
For a frozen transfer, this period is about preparing your uterus rather than waiting on an existing embryo. Estrogen therapy runs for 10 to 14 days to build the uterine lining, followed by a scan to confirm it has reached at least 7 to 8mm with a healthy three-layer (trilaminar) pattern.
Some clinics use a medicated cycle with estrogen tablets, while others use a modified natural cycle that relies on your body’s own ovulation, sometimes supported by mild medication. Both approaches aim for the same outcome a well-timed, receptive uterine lining.
Once the lining is confirmed, progesterone begins, and the transfer is scheduled precisely a Day 5 blastocyst is transferred on the sixth day of progesterone support, since the embryo and the uterus need to be in sync down to the day. If you’ve had previous failed transfers with genetically normal embryos, an ERA test may be done beforehand in a mock cycle to pinpoint your exact implantation window. Still deciding which route fits you read more on frozen vs fresh embryo transfer, which is better.
Weeks 9 to 12: Pregnancy Test and Early Milestones
About 10 to 14 days after transfer fresh or frozen a blood test measures your hCG level. A result above 25 mIU/mL is considered positive, while anything above 100 mIU/mL suggests strong, robust implantation. If you’d like a personalized sense of your odds going in, the CDC’s IVF Success Estimator factors in your age, weight, height, and prior pregnancy history.
In a healthy, progressing pregnancy, hCG roughly doubles every 48 to 72 hours. A slower rise can sometimes signal an early loss or an ectopic pregnancy, which is why your clinic will usually repeat the blood test every few days in the beginning rather than relying on a single number.
Around Week 6-7, an ultrasound checks for a gestational sac and a heartbeat, typically once hCG levels have crossed 1,500 to 2,000 mIU/mL. A follow-up scan around Week 8-10 confirms ongoing growth and heart rate.
By Week 12, if everything looks stable, you’re safely weaned off IVF medications and discharged from the fertility clinic to continue routine pregnancy care with your obstetrician — the point at which most people finally feel able to exhale.
IVF Timeline at a Glance
| Stage | Approximate Timing |
|---|---|
| Period Day 1 / Baseline | Start of cycle |
| Stimulation injections | About 1 to 2 weeks |
| Monitoring visits | Every 1-2 days during stimulation |
| Trigger shot | Around Day 9 to 12 |
| Egg retrieval | Around Day 13 to 14 |
| Embryo culture | About 5 days |
| Embryo transfer (fresh) | Around Day 19 to 21 |
| Pregnancy test | About 2 weeks after transfer |
What Can Make Your Timeline Longer or Shorter
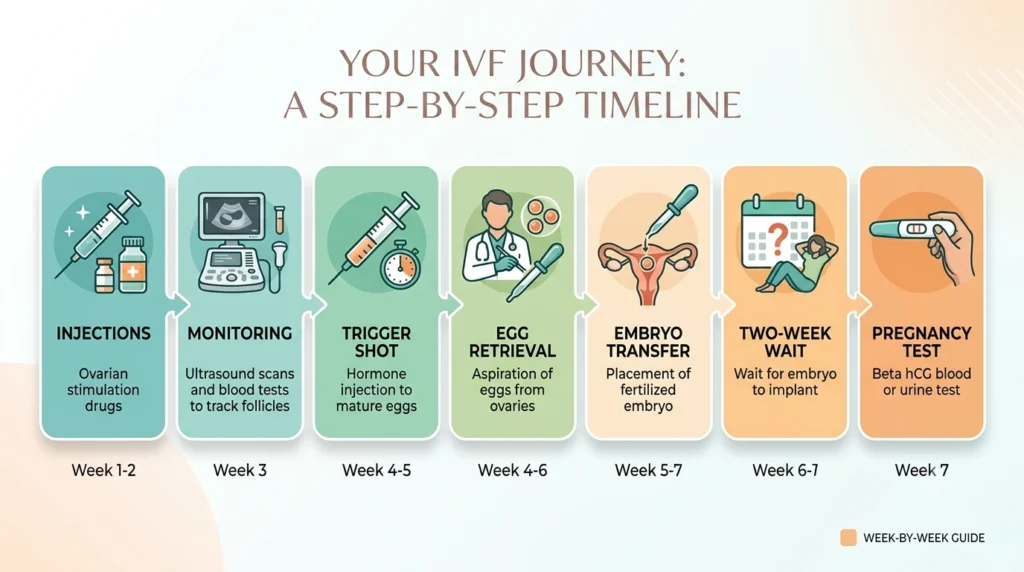
A fresh embryo transfer cycle usually wraps up in about 4 to 6 weeks. A frozen transfer cycle, especially with genetic testing, can stretch to 10 to 16 weeks since it includes a separate preparation cycle. Medication response, whether testing is added, and your clinic’s protocol all shape the exact timing.
The stimulation protocol itself also matters. A long agonist protocol adds one to two weeks of down-regulation before injections even start, while an antagonist protocol (the more common approach today) skips that step and moves straight into stimulation once your period begins. Mild or “mini” IVF protocols use lower medication doses and can shorten the stimulation window slightly, though usually at the cost of fewer eggs retrieved.
A simple way to hold the whole picture in your head: roughly two weeks of stimulation, followed by several days of lab work, then two weeks of waiting for the pregnancy test with a frozen transfer simply adding a full extra cycle in between.
Conclusion
Every IVF cycle follows the same broad rhythm stimulation, monitoring, retrieval, transfer, and the wait but the exact days can shift based on your body’s response and your clinic’s protocol. Knowing this timeline in advance won’t remove the uncertainty completely, but it does make each appointment and each wait a little easier to sit with.
Which part of this timeline are you currently preparing for starting your injections, or waiting on your pregnancy test result